Glitter Snowmen Card

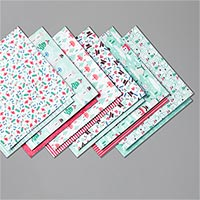
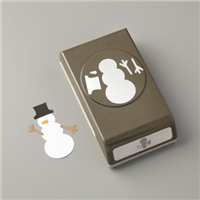
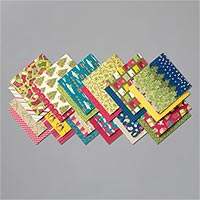
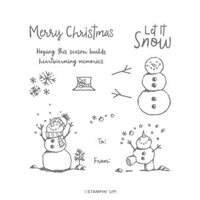
What do you do when you want to make a card quickly? You use a punch and some paper and thats exactly what I did here.  The Let It Snow Speciality DSP has some wonderful festive patterns featuring snowmen, so of which can be punched out with the Snowman Builder Punch. Making cute snowmen in seconds and whats more some sheets of the Let It Snow DSP have glitter accents and so instant sparkle for your card.

Glitter Snowmen Card - flat

I used the punch to create some twig arms for the snowmen, cut in black cardstock to match the background paper. I also added a couple of the felt hats from the Let It Snow Embellishment kit to add a little more cuteness.

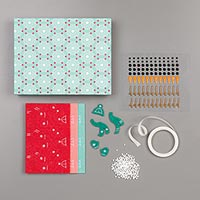
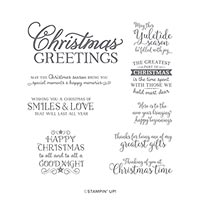
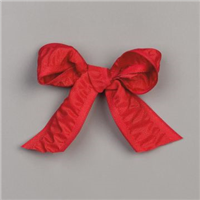
I also added some of the Real Red Rouched 1″ Ribbon for some additonal interest and texture and finished off the card by adding a greeting from the Greatest Part of Christmas.

A quick card to put together but plenty of interest when you use many of the products in the Let It Snow Suite.

Happy Crafting

Joanne x

Supplies:


Merry Merlot Moose Christmas Card

I have to confess when I first saw the Merry Moose stamp set and punch in the catalogue I was like “What am I going to use that for” as being in the UK Moose are not typically an animal associated with Christmas. But you know what I’m completly converted, the gorgoeus sentiments and that super cute little racoon have won me over.

For this card  I used a piece of patterned paper from the Night Before Christmas 6″ x 6″  Designer Paper which features Mossy Meadow, Crumb Cake and Cherry Cobbler, I’ve paired it with a Merry Merlot card base as the Cherry is more Merlot on this pattern, at least for me it is.

Merry Merlot Moose Card close up

The Moose is stamped in Soft Suede ink onto Crumb Cake cardstock and I couldn’t resist adding a little Merry Merlot scarf. I attached him onto a Stitched Circle cut from Very Vanilla cardstock which had been stamped with Mossy Meadow trees to create a background.

Merry Merlot Moose Card flat

I stamped my greeting onto the narrowest of the Stiched Rectangle dies and positioned on my card so it looks as if the Moose is walking across it.

I love this card and am so pleased I’ve added the Merry Moose Bundle to my collection. I’d love to know which stamp set you’ve changed your mind over thuis catalogue.

Happy Crafting

Joanne x

Supplies:


Santa’s Sleigh in a Starry Night Card

For this card I’ve used the Santa’s Sleigh die from the Jolly Season die set which I think is my favourite individual die from all the sets in the Autmn/Winter Catalogue, afterall who deosn’t love Santa and his sleigh.

The background was created with blended inks on Shimmery White cardstock. I used a mix of Pool Party and Mint Macaron in the middle and and the cover it over with night of Navy so there is a lighter area in the middle of the card.

Silent Night Sleigh Card (1)

I stamped a row of snowflakes from the Free Skate stamp in Shimmery Silver Delicata Ink and added the “Merry Christmas” greeting from Snowman Season which works perfectly with the Silver Foil diecut Santa .

I’m wondering now if I should of added a Red Rhinestone onto one of the noses of the reindeer to make my own Rudolf, what do you think?

Happy Crafitng

Joanne x

Supplies:


Merry & Bright Christmas Card

I love fairy lights but I have a weird quirk in which I have coloured lights outside and I have white or blue-toned lights inside, this drives my family mad as they’d have full on coloured ones all over the house. This card is definietly celebrating those outdoor lights in my eyes but I may be persuaded to put this card on my mantlepiece.

It’s really a very simple card with a 8cm x 14.9 cm of Whisper Whisper cardstock stamped with the string of lights stamp in Tuxedo Black Memento Ink. Each of the bulbs was coloured with Stampin’ Blends marker in the following colours: Poppy Parade, Call Me Clover, Night of Navy and Pineapple Punch.

Merry & Bright Card flat

I added a layer of Poppy Parade measuring 9cm x 14.9cm behind the stamped panel and then adhered it to a card base in Call me Clover measuring 14.9cm x 10.5cm.

For the greeting I stamped the greeting on one of the Layered Circle dies and then matted onto anothe circle of Call Me Clover. I love how the circle of stars stamps really pops off the card.

Merry & Bright Card inside

I must have been feeling very festive when I made this card as I’ve even added some coloured fairy lights to the inside of the card.

Happy Stamping

Joanne x

Supplies:


Patchwork Plaid Card Duo

Who doesn’t love cosying up under a patchwork quilt when its cold outside, I know I do and thats whats inspired this patchwork card. Each little patchwork square measures 4″ x 4″ and is cover with 16 1″ squares. I chose two patterns of the main colour, one of a contrasting colour and one white based pattern and I’ve used the same basic pattern for each card, just varied the papers used.

Patchwork Plaid Cherry Cobbler Card

I made one card in Cherry Cobbler and one in Night of Navy. Each card base measures 5″ and is made from Whisper White Thick Cardstock. I then cut a matt of either Cherry Cobbler or Night of Navy measuirng 4 3/4″ x  4 3/4″. I then added a Gold foil layer measuring 4.5″ x 4.5″ and onto this I added my little patchwork sqaures.

Patchwork Plaid Night of Navy

I finished each card off with a Gold Foil Circle, a cardstock tree from the Pine Tree punch and and a greeting from Itty Bitty Christmas stamped on the small banner from from the Smooth Sailing die collection.

I love the patchwork effect and it’s the ideal way to use up all those little scraps we have left after a crafting session. I’m going to make some more cards with this effect very soon.

Happy Crafting

Joanne x

Supplies: